Rediscover Soft Lips: Craft Your Own Homemade Pink Grapefruit Lip Balm
There's something uniquely invigorating about grapefruit – its zesty aroma, its refreshing taste, and its ability to uplift the senses. For many, this adoration extends to lip care, making pink grapefruit lip balm a coveted item. Imagine the frustration when your favorite, all-natural grapefruit lip balm suddenly vanishes from the shelves, leaving your chapped lips yearning for that familiar, soothing comfort. It's a predicament many of us face with beloved products. But what if the solution was not to endlessly search for a replacement, but to create something even better yourself?
Welcome to the wonderful world of DIY beauty, where crafting your own lip balm is not only incredibly easy but also deeply rewarding. Forget complex formulations and lengthy processes; making your own DIY Pink Grapefruit Lip Balm: Easy Recipe for Soft, Glossy Lips is one of the simplest and quickest bath and body projects you can undertake. In as little as ten minutes, you can whip up a batch of 6-8 lip balms, ensuring your lips stay perfectly soft and protected for months, or providing thoughtful, handmade gifts for friends and family. This article will guide you through creating a luscious, all-natural pink grapefruit lip balm that's not only effective against winter dryness but also delivers a delightful sensory experience.
Why Go DIY for Your Lip Care? The Unbeatable Advantages of Homemade Balm
The decision to make your own lip balm goes beyond simply replacing a discontinued product; it's about embracing a philosophy of natural, mindful self-care. Here's why diving into the world of homemade lip balm is a game-changer for your pout:
- Unparalleled Ingredient Control: The most significant benefit is knowing exactly what you're putting on your lips. Commercial lip balms can often contain synthetic fragrances, petroleum derivatives, parabens, phthalates, and other questionable additives. With homemade versions, you select pure, nourishing ingredients, free from harsh chemicals and irritants. This is especially crucial for sensitive skin or those prone to allergies.
- Superior Moisturization and Protection: Many store-bought balms offer temporary relief but don't truly heal chapped lips. By combining a thoughtful blend of natural oils and waxes, your Homemade Pink Grapefruit Lip Balm: Fast Recipe for Natural Color provides deep conditioning, long-lasting moisture, and a protective barrier against environmental aggressors like wind and cold.
- Cost-Effectiveness: While there's an initial outlay for ingredients, a small amount goes a long way. The cost per tube of homemade lip balm is significantly lower than purchasing comparable high-quality natural options from stores. You can create a plentiful supply for a fraction of the price.
- Tailored to Perfection: Your preferences, your rules! Want a hint more gloss? Add more castor oil. Prefer a lighter scent? Adjust the essential oil drops. Desire a deeper pink hue? Increase your natural colorant. Homemade lip balm is a blank canvas for customization, allowing you to create your ideal texture, scent, and tint.
- Surprisingly Simple and Quick: Don't be intimidated by the idea of making your own beauty products. Lip balm is often cited as one of the easiest DIY projects. Unlike lotions, which require emulsification of oil and water, lip balms are a straightforward melt-and-pour process. You can have a batch ready in mere minutes, making it an ideal project for beginners or busy individuals.
- Eco-Friendly Potential: By choosing to refill reusable containers or using recyclable tubes, you can reduce your environmental footprint compared to constantly buying new plastic packaging.
Embracing DIY lip care means healthier, happier lips, a deeper connection to the products you use, and the satisfaction of creation.
The Powerhouse Ingredients Behind Your Pink Grapefruit Lip Balm
The magic of a truly effective lip balm lies in its carefully selected ingredients. For our homemade pink grapefruit lip balm, we'll harness the power of natural emollients and protective waxes to create a luxurious, healing formula. Here's a breakdown of the key players:
- Beeswax: This is the backbone of your lip balm. Beeswax provides structure, giving the balm its solid form. More importantly, it acts as a natural humectant and emollient, locking in moisture and forming a protective barrier on your lips, shielding them from harsh elements. It's available in pellets (easier to measure and melt) or blocks.
- Coconut Oil: Renowned for its immediate softening properties, coconut oil is rich in fatty acids that nourish and hydrate the delicate skin of your lips. It also possesses natural antimicrobial qualities, which can be beneficial for healing minor cracks or irritations.
- Shea Butter: While optional, shea butter elevates your lip balm to a new level of luxury and protection. Its waxier consistency contributes to long-lasting conditioning, forming a robust barrier against moisture loss. Shea butter is intensely moisturizing, anti-inflammatory, and packed with vitamins A and E, making it a powerful ally against deeply chapped lips.
- Sweet Almond Oil / Castor Oil:
- Sweet Almond Oil: A light, easily absorbed oil rich in vitamins E, A, and D. It's excellent for overall skin health, providing deep hydration without feeling greasy.
- Castor Oil: If you desire a beautiful, natural gloss, castor oil is your secret weapon. It offers superior softening capabilities and imparts a lovely shine, enhancing the look of your lips while conditioning them. Using a combination of carrier oils like almond and castor can provide a more comprehensive conditioning experience.
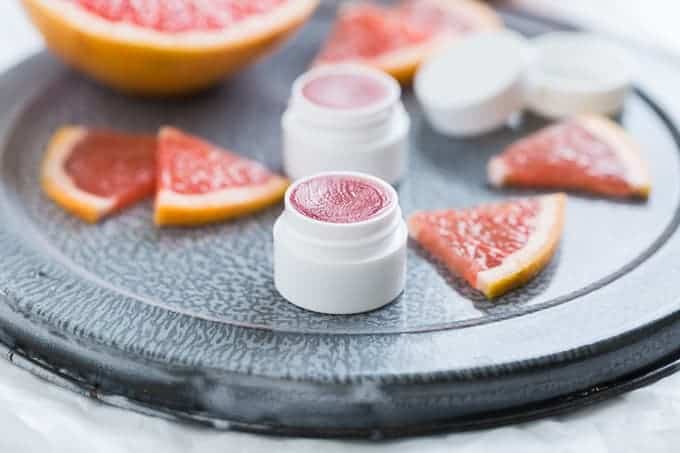
- Pink Grapefruit Essential Oil: This is where the magic of "pink grapefruit" truly comes alive. Pure grapefruit essential oil provides the invigorating, zesty scent and a subtle flavor that makes this balm so addictive. Always choose a high-quality, therapeutic-grade essential oil for topical applications. A word of caution: while grapefruit oil is generally safe, some citrus oils can be photo-sensitive. However, on the lips, especially in a balm, this is less of a concern.
- Natural Colorants (Beet Root Powder or Fresh Beet Juice): To achieve that appealing pink hue, natural colorants are ideal.
- Fresh Beet Juice: A quick solution if you have beets on hand. Add a small amount right at the end. The color can be potent, so start with just a few drops to achieve a light pink.
- Powdered Beet Root: Often preferred for its ease of mixing and consistent color. Available at health food stores and online, it blends smoothly into the melted oils. You can adjust the quantity to tint your lip balm from a subtle blush to a deeper rose. Remember, a little goes a long way, and the color can intensify slightly upon application.
By understanding the role of each component, you can truly appreciate the nourishing power of your homemade creation.
Step-by-Step Guide to Crafting Your Lip Balm Masterpiece
Ready to transform simple ingredients into your new favorite lip balm? Follow these easy steps:
Gather Your Tools and Ingredients:
- Heat-Proof Bowl: A glass bowl (Pyrex or similar) is ideal for melting.
- Saucepan: For creating a double boiler.
- Small Containers or Tubes: You can find empty lip balm tubes or small cosmetic jars at health food stores (like Natural Grocers), craft stores, or online retailers like Amazon.
- Syringe or Dropper: A large syringe (without the needle) or an eyedropper is incredibly helpful for neatly filling your containers and preventing mess.
- Stirring Utensil: A small whisk or spoon.
- Measuring Spoons: For accurate ingredient ratios.
- Ingredients: Refer to the previous section for your chosen oils, beeswax, essential oil, and colorant. A good starting point often includes:
- ½ tablespoon coconut oil
- ½ tablespoon white beeswax pellets
- ½ tablespoon sweet almond oil (or a blend including castor oil)
- 10-15 drops grapefruit essential oil
- Small amount of beet root powder or a few drops of fresh beet juice for color
The Melting Process:
- Set up a Double Boiler: Fill your saucepan with about an inch or two of water and bring it to a gentle simmer over medium-low heat. Place your heat-proof bowl on top of the saucepan, ensuring the bottom of the bowl doesn't touch the water.
- Combine Waxes and Oils: Add your beeswax pellets, coconut oil, and other carrier oils (like sweet almond oil and shea butter, if using) into the glass bowl.
- Melt Thoroughly: Stir occasionally as the ingredients melt. It's crucial that all the beeswax dissolves completely. Continue stirring until there's not a single speck of wax visible in the liquid mixture. Patience here ensures a smooth, consistent balm.
Adding Essential Oils and Color:
- Remove from Heat: Once fully melted, carefully remove the bowl from the double boiler.
- Add Essential Oil: Working quickly (before the mixture cools and solidifies), add your grapefruit essential oil. Start with 10-15 drops for a noticeable scent, and adjust to your personal preference in future batches. Stir well to ensure it's evenly distributed.
- Incorporate Colorant: If using beet root powder, add a tiny pinch (e.g., ¼ teaspoon) and stir vigorously until the color is uniform. For fresh beet juice, add just 1-2 drops at a time, mixing well after each addition, until you achieve your desired light pink shade. Remember, the color can appear slightly stronger on the lips than in the pot.
Pouring and Setting:
- Fill Containers Quickly: Immediately transfer the liquid balm into your containers or tubes. A syringe is invaluable here for neat, precise filling, minimizing spills and mess. Fill them almost to the top.
- Allow to Set: Let the filled containers sit undisturbed at room temperature for at least 15-30 minutes, or until the balm is completely solid and firm. For a quicker set, you can carefully place them in the refrigerator for 5-10 minutes.
- Clean Up Immediately: While the wax residue in your bowl and syringe is still warm and pliable, wipe it clean with a paper towel. If you wait until it hardens, simply warm the bowl again over the double boiler to soften the wax, then wipe clean.
Troubleshooting and Pro Tips for Perfect Lip Balm Every Time
- Consistency Adjustments: If your balm is too soft, add a little more beeswax (melt and re-pour). If it's too hard, add a touch more liquid oil. Make small adjustments at a time.
- Uneven Color: Ensure your colorant (especially powders) is thoroughly mixed into the melted oils. For beet juice, ensure even dispersion before pouring.
- Bubbles in Balm: Pour slowly and carefully. After filling, gently tap the containers on your counter to release any trapped air bubbles before the balm sets.
- Scent Strength: If the grapefruit scent isn't strong enough or is too overpowering, adjust the number of essential oil drops in your next batch. Remember essential oils are potent!
- Storage: Store your homemade lip balms in a cool, dry place away from direct sunlight to maintain their consistency and prolong shelf life. Generally, natural lip balms last for 6-12 months, similar to the shelf life of the oils you used.
- Creative Gifting: Homemade lip balms make fantastic gifts! Consider adding custom labels, tying them with a ribbon, or presenting them alongside other DIY treats like homemade scented lotion bars or grapefruit sugar scrubs (as seen in some inspirations). You can even pipe small decorative shapes, like hearts made from melted beeswax and oils, onto the balm tops for an extra special touch.
- Experimentation: This recipe is a fantastic blank slate. Feel free to experiment with other essential oils for different scents – peppermint for a cooling tingle, lavender for soothing properties, or vanilla for a sweet aroma. You can also try different carrier oils like jojoba or avocado oil to discover your perfect blend.
Embrace Your Inner Alchemist: Enjoy Your Homemade Pink Grapefruit Lip Balm!
From the frustrating disappearance of a beloved product to the sheer delight of creating something even better, your journey into making DIY Pink Grapefruit Lip Balm: Easy Recipe for Soft, Glossy Lips is incredibly rewarding. You've harnessed the power of natural ingredients to create a balm that not only combats chapped lips with superior conditioning and protection but also delivers the uplifting aroma of pink grapefruit. No longer will you dread winter's harsh effects on your pout, nor will you be at the mercy of commercial product availability. Instead, you'll have a consistent supply of perfectly personalized, naturally effective lip care.
So, go ahead – slather on your freshly made Homemade Pink Grapefruit Lip Balm: Fast Recipe for Natural Color and feel the difference. Your lips will thank you for the nourishing care, and you'll bask in the satisfaction of having crafted a truly exceptional product with your own hands. Welcome to the world of beautiful, healthy, and happy lips, made your way!
